Diagram Action Form
This Form consistes of several pages:
Buttons
In addition to normal buttons of
OK ,
Cancel and
Help ,
Apply is equipped. This is for checking those selections made in this Form by showing the actual diagram corresponding to changes. The modified values are applied immediately for drawing diagrams. When Cancel button will be clicked, such modified values will be changed to the original values befor this Form appears. The OK button confirms the modified values.
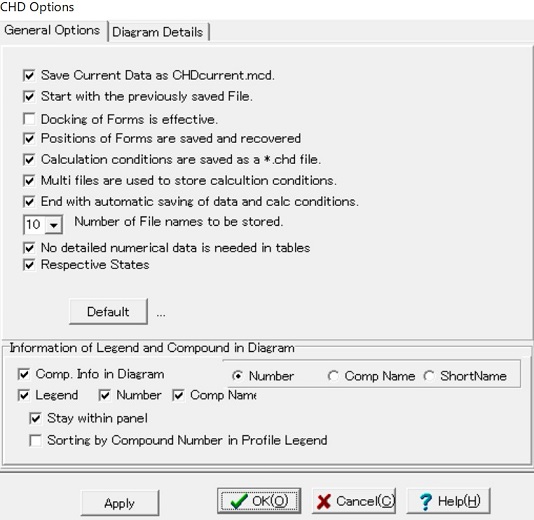
(1) Options Page:
- Options panel contains several items to be checked.
- Option Items
- Save current Data as CHDcurrent.mcd.
When the current data source is the MALT Direct, this option becomes valid. If checked, the present data will be saved in the file named as "CHDcurrent.mcd".
- Start with the previously saved file.
If CHDcurrent.mcd or other saved file is available, this option makes it possible to start such a file. If the file to be started is accompanied with the "*.chd" file, the action associated with the stored conditions will be made to construct diagrams. see. No.5.
- Docking of Forms is effectve.
If checked, the docking procedure will be active. If not checked, all docked forms will be delivered to the original positions. No further docking will be made.
- Positions of Forms are saved and recovered.
If checked, Forms created on starting CHD will be rearranged in their respective positions.
- Calculation conditions are saved as *.chd file.
When checked, the current conditions for constructing diagram will be saved in the file named as "*.chd", where "*" is the same name of the mcd file. When the "*.mcd" file will be read, the chd file is also read simutaneously to reestablish the CHD status of constructing diagrams.
- Multi files are used to store calculation conditions.
By using the same data source, several chd files can be created to store several different conditions for construction, if checked. Even so, it will be complicate to manage the chd files. When a new chd file is saved, this file will be regarded as the current chd file and always this file will be recalled on reading data source. When the other file than "current chd file", the menu of open file should be used; in this menu, all saved chd files will be shown to be selected. The selected file becomes a new"current chd file."
- End with automatic saving of data and calc conditions.
The current data source and the corresponding calculation conditions will be saved in CHDcurrent.mcd and CHDCurrent.chd or in the file already named.
- Number of File names to be stored.
Defualt value is 10. This is because new chd files are named as ".ch0", ".ch1" etc unitl ".ch9."
- No detailed numerial data is needed in tables.
If checked, tabulated information is limited in number and in details.
- Respective States
When a diagram is constructed using temperature (or inverse temperature) as one of diagram axses, those phases having more than one state will be displayed in an apparently different manner for respective states.
- Default button will change to the default setting state.
- No Mandatory Exclude
When mouse is located to the right-hand side of the Default button, the hint of No Mandatory Exclude will appear in the bottom message panel of the main CHD form.
By clicking this No mandatory Exclude button, a new check box for the No madatory Exclude will appear.
- No Mandatory Exclude
The checked state of this button will make it possible to use those
compounds given in red color at any high temperatures.
Still note that warning will be always given as red color
on selection of temperature,
in the constructed diagram legend and in other forms for giving
compound list.
When this is not checked, the madatory exclusion is made always.
- This selection is not stored in the CHDWin.ini file, while this is
stored in the *.chd file. When the *.chd file is used,
the different treatment can be adopted depending on the adopted chemical
systems.
- Information of Legend and Compound in Diagram
This information is also changed in the
(3) Polygon Color page
or the (4) Profile Color page.
- Compound Information in Diagram
If checked,
Number or Compound Name should be selected.
Note that the compound name is longer than compound number so that the diagram becomes more busy for compound name.
The compound number is given as number within the all compounds available in the present data source. Within the CHD, the sequence is based on the NBS order. See details in the MALT manual or help.
- Legend
If checked, Number, Compound Name or both can be given in the list of legend. Always, the respective polygon color or line color will be given in legend.
Legend field provides some manupulation procedures concerning the display of polygons by using popup menus on the righ-hand side click.
- Stay Within panel
Legend is designed to be located in the right-hand side of the constructed diagram. CHD also provides functions of expanding or shrinking daigram inside the display panel. This leads to some cases where legend will disappear outside the display panel(menus; Diagram > Diagram Size > Zoom up or Zoom Down).
If this option is checked, Legend is always staying within the display panel.
In some cases, the diagram and the legend will be overlapped with each other. In such a case, this option should be unchecked. Legen will be displayed outside the diagram even though a part of the lgend will not be seen in the display panel.
- Sorting in terms Compound Number in Profile diagram
If checked, the sorting made in terms of the compound number so that the compound having smallest number will appear top. If not, the profile species are listed in the order of the maximum Y-axis value.
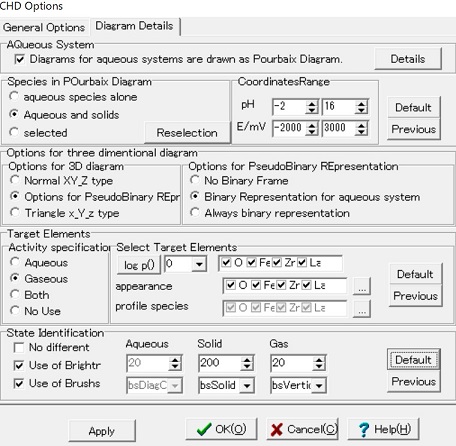
(2)Diagram Details Page:
- Aqueous System
"Diagram for aqueous systems are drawn as Pourbaix Diagram check box" :
If checked, whenever the aqueous system with appropriate conditions is detected during the process of data reading, the automatic action will be started to construct the Pourbaix daigram.
In CHD, the Pourbaix diagram will be constructed based on the generalized procedure of constructing polyhedrons in the themodynamic space together with the special conditions adopted in constructing the Pourbaix diagram concerning the fixation of water activity, the preparation of coordinates, pH and E/V, and setting for additional lines correspoding to the p(O2)=1 atm or p(H2)=1 atm.
Details button : At present, no function will be availabel.
- Pourbaix diagram
- Species in Pourbaix Diagram
Selection should be made among
Aqueous species alone :
So called predominance area diagrams can be set up. This shows which aqueous species becomes dominant against other species as functions of pH and E/V.
Aqueous and solids :
The Normal Pourbaix diagram can be set up to show the equilbira between aqueous species and solid substances such as metal or metal oxide.
selected :
In some cases, the metal hydroxide phases can appear. If such phases are to be outside considerations, selection can be made for respective species/compounds.
When only one solid substance is selected, the special diagram can be set upt to indicate the stability of that substance against the congruent dissolution into aqueous solution. See Examples.
Reselection button
- Coordinates Range
Although the range of coordinates can be changed by using menu: Diagram > Range, the axes range can be fixed in the options respectively.
Min and MAx values should be selected among the given values in the spin edit.
- Default and
Previous buttons
will be active for the above Species in Pourbaix Diagram and Coordinates Range
- Options for three dimensional diagram
- Options for 3D diagram
Selection should be made among
Normal XY_Z type :
The X-axis is kept to be horizontal, while the Y-axis is vertical. the Z-axis extends to the lower and left hand-side.
Pseudo Binary XYz type :
Essentially the Z-axis value is neglected.
Triangle x_Y_z type :
The Y-axis is vertical, while the X-axis and the Z-axiz becomes symmetrically in changining to the lower right-hand side or to the lower left-hand side.
- Options for Pseudo Binary Representation
When the option of "Pseudo Binary XYz type" is selected above,
the following sellection should be made among
No Binary Frame
The three dimensional coordinates will be kept in the frame.
Binary Representation for aqueous system
No indication of the Z-axis is adopted for only the aqueous systems.
Always binary representation
No indication of the Z-axis is always adopted for any systems.
- Target Elements
- Activity specification
Selection should be made among
Aqueous : if checked, the current value for the log a() will be displayed in the log a().
Gaseous : if checked, the current value for the log p() will be displayed.
Both : if checked, the log a() value for the aqueous species will be displayed.
No Use : log a() will disappear. Always the a=1 is applied.
- Select Target Elements
- log a() :
the logarithmic activity or partial pressure should be selected for the aqueous species or gaseous species.
Activity Targets
For the gaseous species, all elements are default setting, whereas hydrogen and oxygen are out of consideration for the aqueous species in default. Those compounds whose contain target elements are selected for this purpose.
Note that individual selction for the activity cannot be made in CHD.
- appearance
For the aqueous species, the element which has the highest NBS order will be selected in default, whereas all elements are selected for the gaseous species. Those compounds consisting of only elements out of selection will be displayed as the transparent polygon or polyhedron showing only bone structure.
Individual specification for transparency can be made by clicking the right-hand side ... button, or alternatively by popup menu > Transparent on / offin the legend field in the chemical potential diagram.
- Profile species
Those species which contain target elements will be displayed. Individual selection can be made by clicking the right-hand side ... button, or alternatively by popup menu > ReSelection in the legend field in the profile diagram.
Note that editing of appearance targets and profile species targets can be made only when the current display panel shows the chemical potential diagram or the profile diagram. The current active panel is indicated by the red square mark on the top-left hand corner.
- Default and
Previous buttons
are active only for the options in the Target Elements.
- State Identification
Respective polygons or lines can be identified by putting name or number of compounds in respective area in a diagram. In addition, CHD provides the functions of differenciating the brush colors and the penstyle for respective species/compounds. Here, further differenciation will be introduced. Depending on the state of the substances, brightness and brush style will be commonly changed.
- No Difference
No differenciation will be made by state.
- Use of Brightness
Normally, the different brightness is used for lines in the profile diagram and for polygons in the chemical potential diagram. Here, brightness can be determined depending on state.
- Use of Brush style
In the normal diagram, only the brushstyle of bsSolid is adopted. Here, selection can be made depending on state.
- Brightness and
Brush Style can be specified by using the combobox for respective items.
Brightness
Default values for brightness are determined so as to give the more concentrated colors to the lines or complicated brush style and to give more bright colors to those which willbe painted with brush style of bsSolid.
Brush style can be selected among the followings:
bsSolid
bsCross
bsClear
bsDiagCross
bsBDiagonal
bsHorizontal
bsFDiagonal
bsVertical
- Default and
Previous buttons
will change items in this state identification alone.
For aqueous systems, the default values are given as follows:

(3)Polygon Color Page:
This page appears corresponding to the current display panel which is showing the chemical potential diagram not the profile diagram.
Main Part
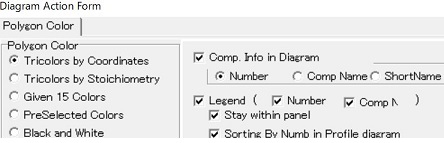
- Polygon color radio group
The current selected color option is displayed in this radio group. The corresponding page will appear in the lower part.
- Compound Name and Legend
This is the same information given in the Legend and Compound in Diagram of (1) Options.
- Display panel
In the left-hand side of the lower part, the display panel is prepared to show
Triangle for coordinate colors:
In the Tricolors page, this shows the colors depending on the coordinate values. Note that the compound can be expressed in terms of the coordinates variables, X, Y, Z as follows
Here, constants of a, b, c, d are a set for describing the compound. By using these constants (a,b,c), a color will be created by mixing three given colors and shown in this triangle.
Plane Color list:
In other options than the coordinates tricolors, the respective compounds have their own colors depending on the selected option. These are listed as a set of the color and the compound name.
- Page Control
This part consists of 4 pages:
(a) Tricolors
(b) 15 Colors
(c) PreSelection
(d) Black and White
-
Tricolors
Selection betweenCoordinates or Elements should be made in the radio buttons. Corresponding to the selection, different options will apear in the left-hand side for the Coordinates and in the right-hand side for Elements.
- Coordinates side
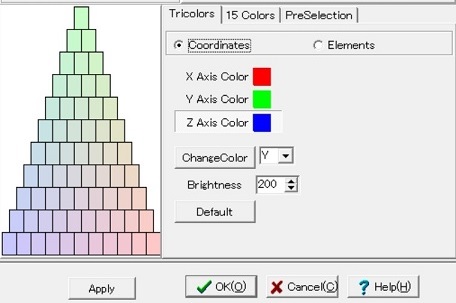
The currently selected tricolors are displayed for the X, Y, Z axes, respectively. Here, change can be made in color and brightness.
Change color button
The color of the focused axis will be changed. The focused axis can be selected by clicking Axis Color button or by selecting among XYZ Axes combobox
.
Double clicking on the target axis also leads to directly display the dialog for selecting a new color.
Brightness spin edit
This is for changing the brightness.
Resulting color distribution can be displayed in the triangle.
Default button
This is for changing to the CHD default tricolors and the default brightness.
- Elements (Stoichiometry)
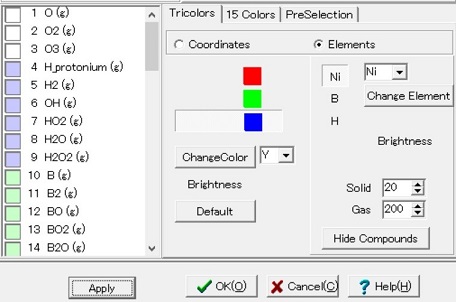
The tricolors are attributed to respective elements among the available elements. The default selection of elements is made to select three elements from the higher order of NBS order number for respective elements.
- Change Element
The selected tricolors corresponding to the elements are shown in the same lines. The focused element can be changed on respective color lines by clicking the Change Element button. The focused element can be changed by selecting in the Elements combobox or by double clicking on the target element.
The Select Element Form will be shown to change element.
Immediately after the changing element, the colors of the respective compounds will be changed and displayed in the compound list.
Note that only three elements can be attributed to colors so that the nonattributed element for the more than three element system can be represented by the white color.
- Change Color
Change can be made in color itself and brightness. The Change color button or the Default button in the left-hand side are still active in the Elements Option.
Threre are three Brightness spin edits for
Aqueous, Solid,
and
Gas, when
the different brightness will be used depending on the state of compounds in the Diagram Details.
No difference is selected, such three spin edits disappear.
- Show Compounds / Hide Compounds
This button is switch between Show Compounds and Hide Compounds.
"Show Compounds" display the current selection of compound colors in the sequence.
"Hide Compounds" display the triangle instead of the compound color list. This makes it possible to obtain the color distribution among the compounds which have the different stoichiometric numbers.
The selected tricolors will be saved in the CHDWin.ini file or in the chd project file so that the same tricolors can be used in the next sessions.
- 15 Colors page
(a) Tricolors
(b) 15 Colors
(c) PreSelection
(d) Black and White
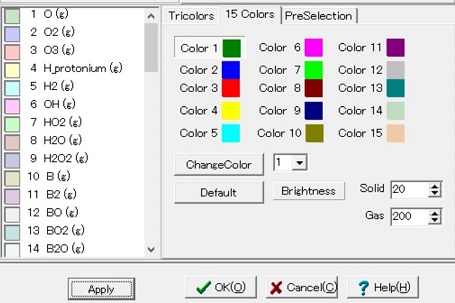
This page is for changing the given 15 colors and the brightness.
- Color
Change Color changes the color of the focused color number. The focused color is shown in the selected state of the buttons or in the
combobox which indicates the number of the focused color.
- Brightness
Appearing buttons depend on the selection of the CHD options for Diagram Details / State Identification.
When the "No different" is selected, the only button for
Brightness
for all states will appear.
When the "Use of Brightness" is selected, Brightness buttons for
Aqueous,
Solid, and
Gas.
- Default button
The given 15 colors and brightness will be changed to the CHD default setting.
- PreSelection page
(a) Tricolors
(b) 15 Colors
(c) PreSelection
(d) Black and White
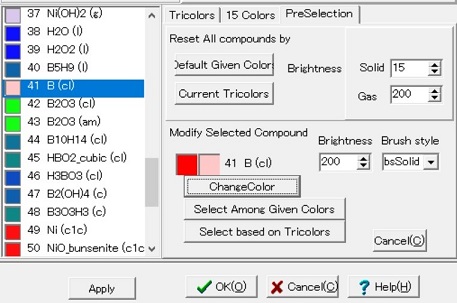
- Reset All Compounds by
Changing the options for colors, Given 15 Colors or Tricolors, can be made here without moving the their respective pages:
- Default Given Colors button
The 15 colors are attributed to respective compounds sequentially.
- Current Tri Colors button
Tricolors are selected to provide respective colors for compounds.
- Brightness
- Modify Selected Compound
The selected individual compound can be edited in color, brightness and the brush style. The selection is made on call from the legend popup menu Change Color on the legend or by the clicking on the target compound in the compound color list (see above at 41 B(cl)).
- Showing the current colors (original and brightened colors) is made on the buttons.
- Selected
Compound Name is given in the next to the colors.
Brightness
- Brush Style for this compound is shown in the compound color list.
- the following changing color buttons are all effective on only one selected compound:
Change Color button
Select Among Given Colors butoon
Select Based On Tricolors button
- Cancel Button
This is for changes in the selected compound.
- Black and White page
(a) Tricolors
(b) 15 Colors
(c) PreSelection
(d) Black and White
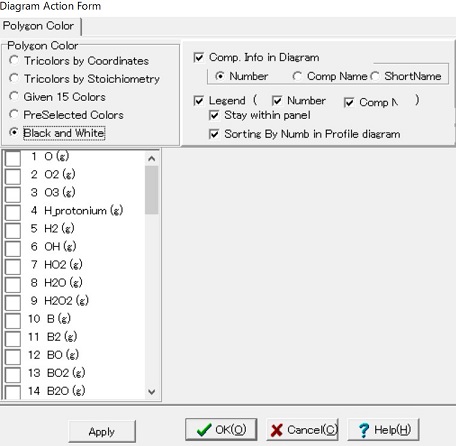
At present, no option is available for Black and White page.
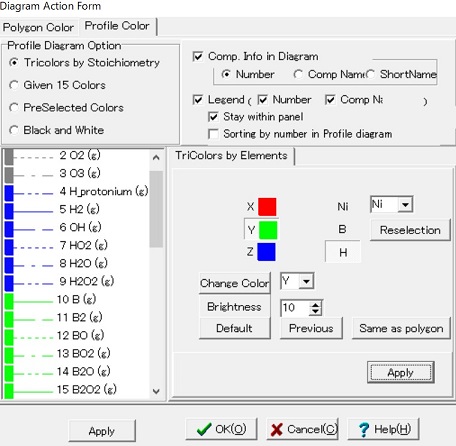
(4) Profile Color Page:
Main part
- Profile Diagram Option
This radio group consists of 4 options. By selecting one of them, the corresponding page will appear in the lower and right-hand side. At the sme time, the color and pen style for respective species/compounds will be updated depending on the selected option.
- Information of Legend and Diagram
- Compound information in Diagram
Selection should be made among:
Number
Compound Name
Short Namae
- Legend
should be given with Number and also with Compound number.
- Stay with panel:
- Sorting by number in Profile diagram.
Common part
Profile Species to be drawn in the profile diagram is listed up here together with their pen color and pen style. Their characteristic properties will change depending on the selected option for colors. In particular, the "preselected" option makes it possilbe to directly select the species / compound to be edited in their pen color or pen style.
Page Control
- Tri Colors page

"TriColors by Coordinates" is not available for the present profile diagram.
- TriColors by Elements
Selection is made by Change in Colors and by Change in Element: The currently selected color for Tricolors.X, Y, Z values are shown in the speed button. The Elements corresponding to those Tricolors.X, Y, Z are given in the same line.
- Change Color
Change Color button is for the focused Tricolors Axis which is shown as the down state of the speed button or the text in the combobox.
small Brightness value will be usually selected for the lines in the profile diagram.
Default button changes to the default tricolors.
Previous selection is kept when this form appeared.
Same As Polygon Color makes the sme selections as those given in the Polygon Color page.
- Change Element
The focused element can be changed by clicking Reselection button. The focused element can be selected by clicking on the speed button for respective elements correspoding to the Tricolors.
X, Y, Z or by directly changing the text of
Elements combo box.
Note that for those compounds which do not contain any elements having colors, the gray color will be prepared for their lines in the profile diagram. It shuold be compared with the different treatment for the plane colors in the chemical potential diagram; instead of Gray, the white color will be attributed to such species/compounds having no colored elements.
Apply
The profile diagram will be redrawn using the newly determined values.
- Given 15 Colors page

- Change Color
For the focused color number, color can be changed by clicking button.
The focused color number can be selected by clicking on the speed button for respective color numbers or by directly change the number in the
combo box.
- Change Brightness can be changed by editing
Brightness combobox.
- Default :
TriColors, Tridimension elements, and Brightness will be replaced with the default values.
Apply
The profile diagram will be redrawn using the presently available colors for respective species.
- Preselected page

- All Compounds
- Here the color option can be selected among:
TriColors ,
15 Colors , and
BW .
All compounds change color dpending on this click and will be shown in the list box, but not in the profile diagram.
- Brightness:
Changes will appear immediately after the change in value.
- Respective Compounds
- Selection of Species/Compound
Selection can be made
The currently selected color, brightness, pen style and pen width are displayed below the compound name combobox so as to check the selected values and their effects on the diagram.
- Changes in